
What things do you configure based on different environments? You might have views that are only for debugging, or you might want to turn off logging for release builds. You probably have multiple backend environments to configure like dev, QA, UAT, stage, prod, etc. Each of these requires different root URLs, API keys and app secrets. The app may also integrate with social media, crash reporting tool, or other analytics tools and we shouldn’t pollute this data with our testing efforts. We might also want to change the app icon and app name to make it visible which environment an installed app is running.
It’s easy enough to develop simple iOS apps and not worry too much about configurations. When you are just starting, it’s probably ok to do some setup with code, modifying the values as needed. You might even try commenting/uncommenting lines of code to switch between different configurations. Some people use #if DEBUG. Either of these will become problematic, quickly. It’s error-prone and time-consuming. So, what do we do?
Let’s walk through an example of setting up a project with multiple environments. I’ll only do two, but the steps can be repeated as needed.
Setup
You can use an existing project or create a new one. A single view app is ok for this demo. I called mine “EnvironmentsTest.” By default, you will have one scheme and two configurations (Debug and Release). Let’s start with a struct to hold our configurable properties.
struct Config {
    let scheme: String
    let host: String
    let key: String

    init() {
        scheme = "https"
        host = "api.testapp.com"
        key = "key.testapp.prod"
    }
}
extension Config {
    static var current: Config = Config()
}
To test this, we can print the configuration when the application finishes launching. Note: don’t forget to remove this, you don’t want your app leaking this information in production.
func application(_ application: UIApplication, didFinishLaunchingWithOptions launchOptions: [UIApplication.LaunchOptionsKey: Any]?) -> Bool {
    print(Config.current)
    return true
}
In the console, you should see the configuration as expected.
Config(scheme: "https", host: "api.testapp.com", key: "key.testapp.prod")
Debug & Release vs. Dev & Prod
When you only have two environments to worry about it almost seems natural to assign debug to dev and release to prod. I’ve seen this a lot. Unfortunately, this doesn’t work. Dev and prod represent environment configurations while debug and release are build configurations. You should be able to mix and match them to some extent. For example, you might want to debug a prod build. You would never release a dev build, but you might want to profile a dev build, and we usually use release configuration for that. And, of course, this completely falls apart when you add more environments.
Injecting configuration through info.plist
We can create entries in the Info.plist file that can be read in to replace the default configuration.
<key>Config</key>
	<dict>
		<key>scheme</key>
		<string>http</string>
		<key>host</key>
		<string>dev-api.testapp.com</string>
		<key>key</key>
		<string>key.testapp.dev</string>
	</dict>

Then change the Config extension to read it. It may be tempting to use infoDictionary directly, especially when we only have three values, but as your configurations get more complicated, it’s going to be nicer to have a decodable.
struct ConfigContainer: Decodable {
    let Config: Config
}

extension Config: Decodable {
    static var current: Config = {
        guard let infoURL = Bundle.main.url(forResource: "Info", withExtension: "plist") else { fatalError("No info.plist in main bundle") }
        do {
            let infoData = try Data(contentsOf: infoURL)
            let decoder = PropertyListDecoder()
            let item = try decoder.decode(ConfigContainer.self, from: infoData)
            return item.Config
        } catch {
            return Config()
        }
    }()
}
Now we see the configuration for the dev environment.
Config(scheme: "http", host: "dev-api.testapp.com", key: "key.testapp.dev")
So, now we are injecting the configuration through the info.plist which is a step in the right direction. Now, how do you switch between these environments? We need a way to define all of the configurations and then have the ability to pick between them.
Targets
Developers often jump to adding targets when they want to have multiple versions (different environments) of the app installed on the same device. Most of the time, adding targets is overkill. When you add a target, you will have to remember to set each target’s settings. For example, if you want to enable camera access in your app, you will have to set the required Info.plist entries for each target individually. Also, whenever you add a file to the project, you will have to ensure that it’s correctly added to each target.
What we’re really after, is to just select the environment/configuration from a dropdown and run it. Schemes are a great way to do this. First, we need to set up some build configurations.
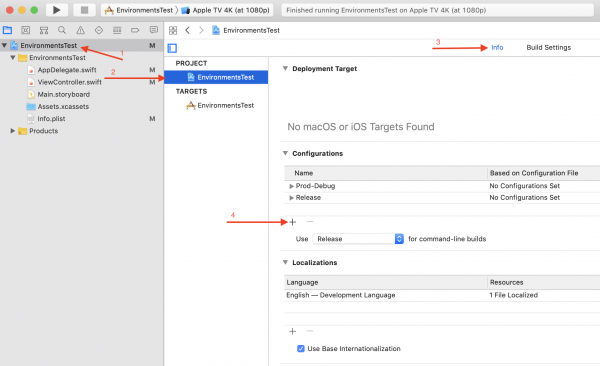
Build Configurations
We start with Debug and Release configurations. Let’s combine these with our prod environment. Just rename Debug to Prod-Debug and Release to Prod-Release. Next, create a new configuration, duplicate Prod-Debug. Rename the new configuration Dev-Debug.
In most cases, you don’t need to duplicate release builds. Doing Debug and Release for every environment gets messy and harder to maintain. I suggest only adding release configurations for environments that you are going to be profiling or distributing.
Schemes
Now that the build configurations are set up, we can create schemes. Click on the schemes drop-down and choose “Edit Scheme…”

Select the “Duplicate Scheme” button in the bottom left corner. Name the new scheme to indicate the target and environment; I’ll call this “EnvironmentsTest – Dev.”
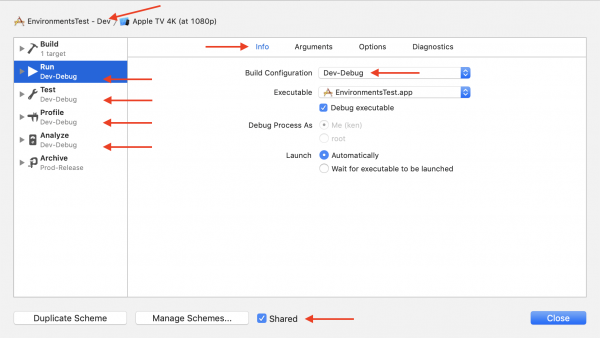 Make sure the scheme is shared. Even if you aren’t working with a team, this will ensure the settings are saved if you move to another computer.
For each type of build on the left (Run, Test, Profile, Analyze) select the Info tab, then set the Build Configuration to Dev-Debug.
If you created a release configuration for this environment, you should use that for Profile. The consequences of profiling in a Debug configuration are outside of the scope of this article, in some cases it’s ok, only know that you may have different results in Release.
I always leave Archive set to Prod-Release. This way, no matter what scheme is selected, and archive build will build for Prod. Then I don’t have to worry about accidentally uploading a Dev build. Ultimately, it’s better to rely on other workflow tools to prevent mistakes like this, but that’s a topic for another day.
Press the Close button when you have finished.
At this point, we have added build configurations and schemes to build for different environments. However, if you run the app, you get the same results for each environment. How do we actually customize it?
Configuration Settings File
A configuration settings file is a great place to set these, per environment, configuration settings. Go to File -> New -> File… or press ⌘N. Scroll down to the “Other” section and select Configuration Settings File. Press Next and name it Dev.xcconfig and Create. Type or copy in the following:
scheme = "http"
host = "dev-api.testapp.com"
key = "key.testapp.dev"
Then go back to your Info.plist file and replace the Config section with the following.
<key>Config</key>
	<dict>
		<key>scheme</key>
		<string>$(scheme)</string>
		<key>host</key>
		<string>$(host)</string>
		<key>key</key>
		<string>$(key)</string>
	</dict>

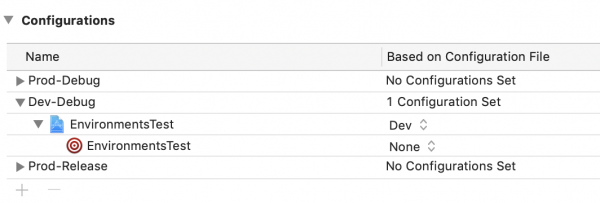
Finally, go back to where you created the project configurations. You’ll notice the right column is Based on Configuration File. Modify the Dev-Debug project to use the Dev configuration.
Now, when you run the project with the Dev scheme, you will see the results of the Dev configuration, and when you run the project with the Prod scheme, you will see an empty configuration. It makes sense, then, that we should create another configuration settings file for Prod builds. However, I don’t like this solution because of exposure. I suggest we handle prod a different way.
Prod config
The Info.plist isn’t the right place to put any application secrets if you are going to distribute it to the public. Because of this, we need to find another way to configure for Prod. Genuinely securing these values is outside of the scope of this article but a good start is to move these values out of the Info.plist and into the compiled code. If you look back at our Config struct, it’s already there. All we have to do is remove the (empty) values from Info.plist, and the code should load our default configuration which is Prod.
Select the project from the Project Navigator, select the target and go to the Build Phases tab. Click the + button and choose New Run Script Phase. Click on the title to rename it to something less generic. I’ll set the title to “Remove Prod Config.” Copy the following into the script area.
PLISTBUDDY="/usr/libexec/PlistBuddy"
INFO_PLIST="${TARGET_BUILD_DIR}/${INFOPLIST_PATH}"
if [[ -z ${host} ]]; then
$PLISTBUDDY -c "Delete :Config" "${INFO_PLIST}" || true
fi
What this is saying is that if the “host” variable is empty (or doesn’t exist) then delete the Config object from the Info.plist file.
Note: You have to do a clean build (⌘⇧K) to force the build phase to run.
Now you will get the right results in each scheme! 🎉
App Transport Security
As you’re probably aware, Apple now requires apps to support best practice HTTPS security. It’s usually a good idea to follow this rule for every environment, even when developing in Dev. However, you can’t always do this (e.g., when preparing for a “Local” environment) or maybe it’s just not configured yet, but you still need to move forward on development. We can handle this with another Run Script Phase. Name this one “Http – Allows Arbitrary Loads” and copy the following into the script area.
PLISTBUDDY="/usr/libexec/PlistBuddy"
INFO_PLIST="${TARGET_BUILD_DIR}/${INFOPLIST_PATH}"
if [ ${scheme} == "http" ]; then
$PLISTBUDDY -c "Add :NSAppTransportSecurity dict" "${INFO_PLIST}"
$PLISTBUDDY -c "Add :NSAppTransportSecurity:NSAllowsArbitraryLoads bool true" "${INFO_PLIST}" || true
$PLISTBUDDY -c "Set :NSAppTransportSecurity:NSAllowsArbitraryLoads true" "${INFO_PLIST}"
else
$PLISTBUDDY -c "Delete :NSAppTransportSecurity:NSAllowsArbitraryLoads" "${INFO_PLIST}" || true
fi
Test this with each scheme by adding printing the value in application(_:didFinishLaunchingWithOptions:)
print(String(describing: Bundle.main.infoDictionary?["NSAppTransportSecurity"]))
Pretty sweet, right?
Run Dev and Prod side-by-side
Sometimes it is convenient to have both a Dev build and a Prod build installed on the same device so that you can switch between the two. All you have to do to make this happen is change the bundle id. You’ll also want an easy way to determine which one is which. To do this, we can change the display name and the icon.
Note: For all these settings, I always leave the Production Release build as is; this is the build that goes to the App Store and should not be modified. Because of this rule, it is also easily identified since it doesn’t have any modifiers.
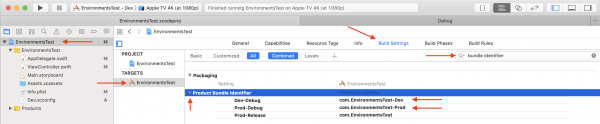
Bundle Identifier
To change the Bundle Identifier, go to your target’s build settings and search for “bundle identifier” and click the arrow to expand all of the configurations. I usually append a “-” followed by the configuration name.
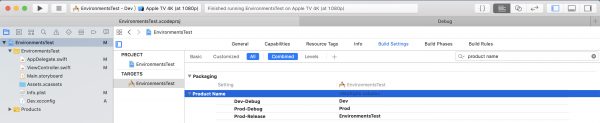
Display Name
The steps are the same as Bundle Identifier, but this time search for “product name.” For this, I recommend replacing the name with the environment. Otherwise, the text may be too long to be useful.
 You can also use the version number in the display name to quickly determine which version is installed.
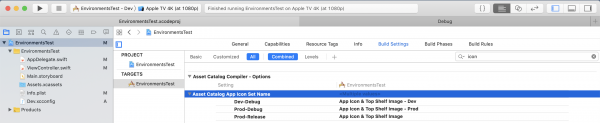
Icon
Changing the icon is almost just as easy. On the same screen, search for “icon.” You should see “Asset Catalog App Icon Set Name.” Again, add a dash followed by the configuration name.
Now, create icon sets, in your asset catalog, for each of those configurations.
Conclusion
Performing all of these steps for each configuration might seem like a lot of work to change a few settings, but it’s well worth it. Sure, it takes some time to get it all set up, but switching becomes trivial when completed. Take the time to do it right, and you’ll save time in the long run. You’ll save time by quickly switching between environments. You’ll save yourself the hassle of making mistakes when doing it manually.
I’d love to hear your feedback, questions or thoughts; find me on twitter @kenboreham
Thanks for reading! 🔥👍
configconfigurationdebugdevdevelopmentenvironmentinfo.plistplistprodproductionreleaseschemesettingside-by-sidestagingstgtargetXcode
Best strategies for configuring multiple environments in Xcode projects
October 21, 2018
General Coding
Comments Off on Best strategies for configuring multiple environments in Xcode projects
Ken Boreham
What things do you configure based on different environments? You might have views that are only for debugging, or you might want to turn off logging for release builds. You probably have multiple backend environments to configure like dev, QA, UAT, stage, prod, etc. Each of these requires different root URLs, API keys and app secrets. The app may also integrate with social media, crash reporting tool, or other analytics tools and we shouldn’t pollute this data with our testing efforts. We might also want to change the app icon and app name to make it visible which environment an installed app is running.
It’s easy enough to develop simple iOS apps and not worry too much about configurations. When you are just starting, it’s probably ok to do some setup with code, modifying the values as needed. You might even try commenting/uncommenting lines of code to switch between different configurations. Some people use #if DEBUG. Either of these will become problematic, quickly. It’s error-prone and time-consuming. So, what do we do?
Let’s walk through an example of setting up a project with multiple environments. I’ll only do two, but the steps can be repeated as needed.
Setup
You can use an existing project or create a new one. A single view app is ok for this demo. I called mine “EnvironmentsTest.” By default, you will have one scheme and two configurations (Debug and Release). Let’s start with a struct to hold our configurable properties.
To test this, we can print the configuration when the application finishes launching. Note: don’t forget to remove this, you don’t want your app leaking this information in production.
In the console, you should see the configuration as expected.
Debug & Release vs. Dev & Prod
When you only have two environments to worry about it almost seems natural to assign debug to dev and release to prod. I’ve seen this a lot. Unfortunately, this doesn’t work. Dev and prod represent environment configurations while debug and release are build configurations. You should be able to mix and match them to some extent. For example, you might want to debug a prod build. You would never release a dev build, but you might want to profile a dev build, and we usually use release configuration for that. And, of course, this completely falls apart when you add more environments.
Injecting configuration through info.plist
We can create entries in the Info.plist file that can be read in to replace the default configuration.
Then change the Config extension to read it. It may be tempting to use infoDictionary directly, especially when we only have three values, but as your configurations get more complicated, it’s going to be nicer to have a decodable.
Now we see the configuration for the dev environment.
So, now we are injecting the configuration through the info.plist which is a step in the right direction. Now, how do you switch between these environments? We need a way to define all of the configurations and then have the ability to pick between them.
Targets
Developers often jump to adding targets when they want to have multiple versions (different environments) of the app installed on the same device. Most of the time, adding targets is overkill. When you add a target, you will have to remember to set each target’s settings. For example, if you want to enable camera access in your app, you will have to set the required Info.plist entries for each target individually. Also, whenever you add a file to the project, you will have to ensure that it’s correctly added to each target.
What we’re really after, is to just select the environment/configuration from a dropdown and run it. Schemes are a great way to do this. First, we need to set up some build configurations.
Build Configurations
We start with Debug and Release configurations. Let’s combine these with our prod environment. Just rename Debug to Prod-Debug and Release to Prod-Release. Next, create a new configuration, duplicate Prod-Debug. Rename the new configuration Dev-Debug.
In most cases, you don’t need to duplicate release builds. Doing Debug and Release for every environment gets messy and harder to maintain. I suggest only adding release configurations for environments that you are going to be profiling or distributing.
Schemes
Now that the build configurations are set up, we can create schemes. Click on the schemes drop-down and choose “Edit Scheme…”
Select the “Duplicate Scheme” button in the bottom left corner. Name the new scheme to indicate the target and environment; I’ll call this “EnvironmentsTest – Dev.”
For each type of build on the left (Run, Test, Profile, Analyze) select the Info tab, then set the Build Configuration to Dev-Debug.
If you created a release configuration for this environment, you should use that for Profile. The consequences of profiling in a Debug configuration are outside of the scope of this article, in some cases it’s ok, only know that you may have different results in Release.
I always leave Archive set to Prod-Release. This way, no matter what scheme is selected, and archive build will build for Prod. Then I don’t have to worry about accidentally uploading a Dev build. Ultimately, it’s better to rely on other workflow tools to prevent mistakes like this, but that’s a topic for another day.
Press the Close button when you have finished.
At this point, we have added build configurations and schemes to build for different environments. However, if you run the app, you get the same results for each environment. How do we actually customize it?
Configuration Settings File
A configuration settings file is a great place to set these, per environment, configuration settings. Go to File -> New -> File… or press ⌘N. Scroll down to the “Other” section and select Configuration Settings File. Press Next and name it Dev.xcconfig and Create. Type or copy in the following:
Then go back to your Info.plist file and replace the Config section with the following.
Finally, go back to where you created the project configurations. You’ll notice the right column is Based on Configuration File. Modify the Dev-Debug project to use the Dev configuration.
Now, when you run the project with the Dev scheme, you will see the results of the Dev configuration, and when you run the project with the Prod scheme, you will see an empty configuration. It makes sense, then, that we should create another configuration settings file for Prod builds. However, I don’t like this solution because of exposure. I suggest we handle prod a different way.
Prod config
The Info.plist isn’t the right place to put any application secrets if you are going to distribute it to the public. Because of this, we need to find another way to configure for Prod. Genuinely securing these values is outside of the scope of this article but a good start is to move these values out of the Info.plist and into the compiled code. If you look back at our Config struct, it’s already there. All we have to do is remove the (empty) values from Info.plist, and the code should load our default configuration which is Prod.
Select the project from the Project Navigator, select the target and go to the Build Phases tab. Click the + button and choose New Run Script Phase. Click on the title to rename it to something less generic. I’ll set the title to “Remove Prod Config.” Copy the following into the script area.
What this is saying is that if the “host” variable is empty (or doesn’t exist) then delete the Config object from the Info.plist file.
Note: You have to do a clean build (⌘⇧K) to force the build phase to run.
Now you will get the right results in each scheme! 🎉
App Transport Security
As you’re probably aware, Apple now requires apps to support best practice HTTPS security. It’s usually a good idea to follow this rule for every environment, even when developing in Dev. However, you can’t always do this (e.g., when preparing for a “Local” environment) or maybe it’s just not configured yet, but you still need to move forward on development. We can handle this with another Run Script Phase. Name this one “Http – Allows Arbitrary Loads” and copy the following into the script area.
Test this with each scheme by adding printing the value in application(_:didFinishLaunchingWithOptions:)
Pretty sweet, right?
Run Dev and Prod side-by-side
Sometimes it is convenient to have both a Dev build and a Prod build installed on the same device so that you can switch between the two. All you have to do to make this happen is change the bundle id. You’ll also want an easy way to determine which one is which. To do this, we can change the display name and the icon.
Note: For all these settings, I always leave the Production Release build as is; this is the build that goes to the App Store and should not be modified. Because of this rule, it is also easily identified since it doesn’t have any modifiers.
Bundle Identifier
To change the Bundle Identifier, go to your target’s build settings and search for “bundle identifier” and click the arrow to expand all of the configurations. I usually append a “-” followed by the configuration name.
Display Name
The steps are the same as Bundle Identifier, but this time search for “product name.” For this, I recommend replacing the name with the environment. Otherwise, the text may be too long to be useful.
Icon
Changing the icon is almost just as easy. On the same screen, search for “icon.” You should see “Asset Catalog App Icon Set Name.” Again, add a dash followed by the configuration name.
Now, create icon sets, in your asset catalog, for each of those configurations.
Conclusion
Performing all of these steps for each configuration might seem like a lot of work to change a few settings, but it’s well worth it. Sure, it takes some time to get it all set up, but switching becomes trivial when completed. Take the time to do it right, and you’ll save time in the long run. You’ll save time by quickly switching between environments. You’ll save yourself the hassle of making mistakes when doing it manually.
I’d love to hear your feedback, questions or thoughts; find me on twitter @kenboreham
Thanks for reading! 🔥👍
Share this:
configconfigurationdebugdevdevelopmentenvironmentinfo.plistplistprodproductionreleaseschemesettingside-by-sidestagingstgtargetXcode