Author: Ken Boreham
Using Multer with Multer-S3 for File Uploads to AWS S3
When building web applications that handle file uploads, one of the most common requirements is the ability to store these files securely and efficiently. AWS S3 (Amazon Simple Storage Service) provides a scalable, high-speed, low-cost web-based service aimed at online backup and storage. Integrating S3 with a Node.js application for file uploads can be streamlined using multer, a Node.js middleware for handling multipart/form-data (a standard way to upload files via HTTP), along with multer-s3, a library that allows multer to upload files directly to AWS S3.
In this blog post, we’ll explore how to implement file uploads in a Node.js application using multer and multer-s3. We’ll also discuss how to unit test this functionality by mocking AWS S3 to ensure our application behaves correctly without actually performing I/O operations against AWS infrastructure.
Setting Up Your Node.js Application
Before diving into the specifics, let’s set up a basic Express.js application. Ensure you have Node.js installed, and then initialize a new project:
mkdir multer-s3-demo
cd multer-s3-demo
npm init -y
npm install express multer @aws-sdk/client-s3 multer-s3 dotenv
Create an app.js file:
const express = require('express')
const app = express()
const port = process.env.PORT || 3000

app.get('/', (req, res) => {
  res.send('Hello World!')
})

app.listen(port, () => {
  console.log(`App listening at <http://localhost>:${port}`)
})

module.exports = app // for testing purposes
Add a script to start the application in package.json:
"scripts": {
    "start": "node app.js", // <-- Add this line
    "test": "echo \"Error: no test specified\" && exit 1"
  },
Now you can run the app with npm start and make sure things are working by sending a request curl "[http://localhost:3000](http://localhost:3000/)" and you should see Hello World!
Integrating Multer with AWS S3
To handle file uploads to AWS S3, you’ll need to configure multer with multer-s3. Update your project to include environment variables for AWS credentials:
-
Set up environment variables in a
.envfile:AWS_ACCESS_KEY_ID=your_access_key AWS_SECRET_ACCESS_KEY=your_secret_key AWS_REGION=your_region AWS_S3_BUCKETNAME=your_bucket_name -
Configure multer and multer-s3 in a new file
upload.js:require('dotenv').config() const S3Client = require('@aws-sdk/client-s3').S3Client const multer = require('multer') const multerS3 = require('multer-s3') const s3Client = new S3Client({ region: process.env.AWS_REGION, credentials: { accessKeyId: process.env.AWS_ACCESSKEYID ?? '', secretAccessKey: process.env.AWS_SECRETACCESSKEY ?? '', }, }) const upload = multer({ storage: multerS3({ s3: s3Client, bucket: process.env.AWS_S3_BUCKETNAME, metadata: function (req, file, cb) { cb(null, {fieldName: file.fieldname}) }, key: function (req, file, cb) { cb(null, Date.now().toString() + '-' + file.originalname) } }) }) module.exports = upload -
Create an endpoint to handle file uploads in
app.js:const upload = require('./upload') app.post('/upload', upload.single('file'), (req, res) => { if (!req.file) { return res.status(400).send('No file uploaded.') } res.send({ message: 'File uploaded successfully', file: req.file }) })
At this point we should be able to upload a file to S3 through our API. We can test this by sending any handy/nearby file such as our app.js file.
curl "http://localhost:3000/upload" -F "file=@app.js"
Hopefully you will see a successful response. ****Double check in S3 to make sure the file exists.
Example good response (includes file details):
{
 "message":"File uploaded successfully",
 "file":{
   "fieldname":"file",
   "originalname":"app.js",
   "encoding":"7bit",
   "mimetype":"application/octet-stream",
   "size":470,
   "bucket":"YOUR_AWS_S3_BUCKETNAME",
   "key":"2445762390563-app.js",
   "acl":"private",
   "contentType":"application/octet-stream",
   "contentDisposition":null,
   "contentEncoding":null,
   "storageClass":"STANDARD",
   "serverSideEncryption":null,
   "metadata":{"fieldName":"file"},
   "location":"https://BUCKET.s3.REGION.amazonaws.com/2445762390563-app.js",
   "etag":"\"077da556b90169d85ea622402a5137c5\""
 }
}
Error Handling in File Uploads
Handling errors effectively is crucial for maintaining a reliable application, especially when dealing with external services like AWS S3. Here are key strategies for robust error handling:
-
Catch AWS S3 Errors: Ensure that your application gracefully handles AWS errors such as network issues, access permissions, and exceeded storage limits.
app.post('/upload', upload.single('file'), (req, res) => { res.send({ message: 'File uploaded successfully', file: req.file }) }, (err, req, res, next) => { if (err instanceof S3ServiceException) { console.log(err) return res.send('File upload exception') } res.send('Unexpected error') } ) -
Validate File Types and Sizes: Before a file reaches S3, validate its type and size within the Multer configuration. This prevents unnecessary S3 requests for files that don’t meet your criteria.
Add a filter function to upload.js above upload
const fileFilter = (req, file, cb) => {
  if (file.mimetype === 'image/jpeg' || file.mimetype === 'image/png') {
    cb(null, true)
  } else {
    cb(new Error('Invalid file type, only JPEG and PNG is allowed!'), false)
  }
}
Then we can use this in our multer configuration along with setting a file size limit
const upload = multer({ storage: multerS3({ s3: s3Client, bucket: process.env.AWS_S3_BUCKETNAME, metadata: function (req, file, cb) { cb(null, {fieldName: file.fieldname}) }, key: function (req, file, cb) { cb(null, Date.now().toString() + '-' + file.originalname) } }), fileFilter, limits: { fileSize: 1024 * 1024 * 5 } // 5 MB limit }) -
Handle Multer-Specific Errors: Listen for errors on the request object. This can catch Multer errors related to file size and field names that do not align with your expectations. Note that we also move S3 error handling here as well.
app.post('/upload',
  (req, res) => {
    const uploadSingle = upload.single('file')
    uploadSingle(req, res, (err) => {
      if (err instanceof multer.MulterError) {
        // Eg. File too large, Unexpected field
        return res.status(400).send(err.message)
      } else if (err instanceof S3ServiceException) {
        // Eg. The bucket does not allow ACLs
        return res.status(500).send(err.message)
      } else if (err) {
        // Eg. Invalid file type
        return res.status(400).send(err.message)
      }
      if (!req.file) {
        // Eg. File field was empty
        return res.status(400).send('No file uploaded.')
      }
      res.send({
        message: 'File uploaded successfully',
        file: req.file
      })
    })
  }
)
Customizing the Location Based on req and file
To dynamically customize where files are stored based on the request or file attributes, you can modify the key function in your Multer-S3 configuration:
-
Dynamic Paths Based on User, Date, or File: You can use request headers or file metadata to build the file path dynamically.
key: function (req, file, cb) {
  // Use user id and date to categorize files
  const userId = req.user.id // Assuming user info is available in request
  const date = new Date().toISOString().split('T')[0]
  cb(null, `uploads/${userId}/${date}/${file.originalname}`)
}
Writing Unit Tests by Mocking AWS S3
Unit testing file uploads can be challenging due to the external dependencies involved (AWS S3 in this case). However, by mocking these dependencies, we can simulate the behavior of our application without actually uploading files to S3.
-
Install Jest and AWS SDK mocks:
npm install --save-dev jest supertest aws-sdk-client-mock -
Set up Jest by configuring the
package.json:"scripts": { "test": "jest" }, "jest": { "testEnvironment": "node" } -
Tell the app not to listen when testing change in
app.js:if (process.env.NODE_ENV !== 'test') { app.listen(port, () => { console.log(`App listening at <http://localhost>:${port}`) }) } -
Create a test file
upload.test.js:const request = require('supertest') const { S3Client } = require('@aws-sdk/client-s3') const { mockClient } = require('aws-sdk-client-mock') const app = require('./app') const s3Mock = mockClient(S3Client) describe('File upload', () => { beforeEach(() => { s3Mock.reset() }) it('should upload a file to S3', async () => { const res = await request(app) .post('/upload') .attach('file', Buffer.from('test file'), 'test.jpeg') expect(s3Mock.calls().length).toBe(1) expect(res.status).toBe(200) expect(res.body.file).toBeDefined() }) })
Advanced Testing Techniques
Going beyond basic tests, you can incorporate more complex scenarios and integrate testing with continuous integration pipelines:
-
Test for Different File Types and Sizes: Ensure your application only accepts files that meet specific criteria by testing with files of various sizes and types.
it('should reject oversized files', async () => { s3Mock.restore() const res = await request(app) .post('/upload') .attach('file', Buffer.alloc(1024 * 1024 * 10), 'test-big-file.png') expect(res.status).toBe(400) expect(res.text).toContain('File too large') }) -
Mock Different S3 Responses: Use different mock implementations to simulate how your application handles S3 errors like
ServiceUnavailableorAccessDenied.it('should error on S3 failure', async () => { const error = new S3ServiceException({ name: 'ServiceUnavailable', $fault: 'server', $metadata: {}, }) s3Mock.rejects(error) const res = await request(app) .post('/upload') .attach('file', Buffer.from('test file'), 'test.jpeg') expect(s3Mock.calls().length).toBe(1) expect(res.status).toBe(500) expect(res.text).toContain('ServiceUnavailable') })
By enhancing your application with sophisticated error handling, advanced testing, dynamic file path configuration, and rigorous pre-upload checks, you create a more robust, secure, and user-friendly file upload feature. These improvements not only optimize the operational aspects but also enhance the security and efficiency of handling user-generated content.
Conclusion
By integrating multer with multer-s3, Node.js applications can efficiently handle file uploads directly to AWS S3. The combination of these tools simplifies the file handling process, allowing developers to focus on core application logic without worrying about the details of file storage and security.
Mocking AWS S3 in unit tests is crucial for ensuring that our application behaves as expected without the overhead of real network I/O. This approach not only saves time during testing but also reduces costs associated with using AWS resources. With proper testing in place, we can confidently deploy our file upload features, knowing they’ll work correctly in production.
Swift Basics
Swift is the primary language used to build modern iOS apps. The current version of the language is Swift 5. With ABI and module stability in place, the code you write today will be valid in future versions of Swift. With SwiftUI we are entering a whole new paradigm for building iOS apps.
Don’t worry if you don’t understand what I’m talking about. You will later, but for now, the important takeaway is this; There’s never been a better time to learn Swift.
Where to start
There are a few key components to Swift to get started.
- Variables
- Operators
- Collections
- Functions
- Flow Control
- Classes
- Objects
- Inheritance
There is so much more in the language but these are some of the most common tools that you will use. Once you learn the basics the rest will make more sense. You’ll have a good understanding of the Swift language and all the tools you need to make swift apps.
Playground
I highly recommend that you follow along in a Playground. Learning can be much more impactful when you take action. Manually type in the examples and play around with it for a while.

If you don’t know what a playground is in Xcode, it’s really simple to get started. If you haven’t already, you’ll need to install Xcode. Then, when you launch Xcode you will see a Welcome page with a button “Get started with a playground”. You could also use the menu File -> New -> Playground…
Select iOS and Blank for the template and save it to your Desktop folder or somewhere you’ll remember.
Variables
Variables are the fundamental building blocks used to hold some bit of data. Let’s see what they are.
When you created a playground you would see this line.
var str = "Hello, playground"This is a statement that declares a var (variable) named str that is of type String and sets its value to “Hello, playground”. Let’s break this down further.
The first word, var, is a keyword in swift which tells the compiler that we want to declare a variable. When declaring a variable you must also give it a name.
The second part, str, is the name of the variable. You can use almost any characters, including Unicode, in the name. However, the name can’t have any spaces or start with a number or contain any mathematical symbols. In general, you should choose a name that’s descriptive and meaningful. For names with multiple words, the convention is to use lower camel case format, which means that the first word is lowercase and each word following it begins with a capital letter. As an example, we can write the line as follows.
var greetingText = "Hello, playground"After the name is the assignment operator (equals sign). This means that we take the value of the expression on the right-hand side and assign it to the variable. Later we can recall the value by referencing the name of the variable.
The final part of this is the value, “Hello, playground”. We can change this value however we like. Try changing it to your name.
There is one more piece of information needed when declaring a variable and that is the type. In this example, the type is defined, implicitly, as a String. But we can also declare is explicitly like so.
var greetingText: String = "Hello, iOS"There are several built-in types and you can even create your own compound types. Here are a few simple examples.
var age: Int = 36
var isLearning: Bool = true
var progress: Double = 0.01
Although a variable can change its value, it cannot change its type. For example, we can later change the age variable to have the value 37 but we can’t set it to “hello”.
Constants
Similarly, we can also declare a constant using the keyword, let. The difference between constants and variables is that the value of a constant cannot be changed after it’s set, while a variable can change values as often as desired.
var age: Int = 36
age = 37

let birthYear = 1983
birthYear = 1982
When you type this example into your playground you will notice that the last line gives an error. That is because we have declared birthYear as a constant (let).
You can code your entire application without ever using constants, but that can lead to problems. Some things, like birthYear, do not change and should be constant to avoid accidental changes. Declaring a constant may also allow the compiler to better optimize your code giving better performance.
It may be difficult at first to know if you need a variable or a constant. As a rule of thumb, for people starting out, always start with a constant. You can update the declaration at a later point, if and when you need to update the value.
Next steps
So far you have learned how to declare and define variables and constants and the difference between them. You have also begun to learn about types and seen examples of the basic built-in types.
The next article will be about collections in Swift. Collections are types of variables that hold multiple values. Hope to see you there.
Setting up Xcode
One of the crucial tools to develop code and build iOS apps is a software called Xcode. Xcode is an IDE (Integrated Development Environment) that helps you write and organize code, compile the code into an app and debug your app using a simulator or physical device.
The process for setting up Xcode can be easy as pie. Here is a quick start guide to setting up Xcode on your Mac.
Lossy decodable for arrays
This article is about exploring a way to decode only the “good” items from arrays.
It’s common for apps to decode arrays of data. For example, you may have a feed of user-generated content or a list of items for sale. To get this data, the app will make a network request to some backend API. Then, that API will most likely send the data back as JSON.
Swift gives us a great way to decode such data. You can simply set your objects to conform to the Decodable protocol. Then use JSONDecoder to build your objects.
Unfortunately, the data isn’t always perfect. If the data in the JSON doesn’t match your model the decoder will throw an error. And if just one field of an object or sub-object isn’t right, the entire list is thrown out.
So, what can we do about it? How can we allow the good items to go through and only reject the bad items without rejecting the entire list?
Starting with good data
Let’s look at an example. We’re going to decode a page of messages.
struct Message: Decodable {
    let sender: String
    let subject: String?
    let body: String
}

struct MessagePage: Decodable {
    let page: Int
    let limit: Int
    let items: [Message]
}
We have a page of message items which each contain a sender, optional subject and body.
Lets look at some good test data:
let goodTestData = """
{
    "page": 1,
    "limit": 10,
    "items": [
        {
            "sender": "Sender One",
            "subject": null,
            "body": "Body one."
        },
        {
            "sender": "Sender Two",
            "body": "Body two."
        },
        {
            "sender": "Sender Three",
            "subject": "Third subject",
            "body": "Body three."
        }
    ]
}
""".data(using: .utf8)!
Since the subject is optional, it can be null, missing, or contain a valid value and the decoder will easily handle each of those cases.
Finally, we can test decoding this data with something like this:
let jsonDecoder: JSONDecoder = {
    let decoder = JSONDecoder()
    decoder.keyDecodingStrategy = .convertFromSnakeCase
    return decoder
}()

do {
    let posts = try jsonDecoder.decode(MessagePage.self, from: testData)
    posts.items.forEach { print($0) }
} catch {
    print(error)
}
So far, there’s no issue. We tested the expected good data and everything is properly decoded. Ship it! Unfortunately, the real world is full of poorly constructed data. Our assumptions may be false.
Dealing with bad data
What if we were working with this data instead:
let testData = """
{
    "page": 1,
    "limit": 10,
    "items": [
        {
            "sender": "Sender One",
            "subject": null,
            "body": "Body one."
        },
        {
            "sender": "Sender Two",
            "body": "Body two."
        },
        {
            "subject": "Third subject",
            "body": "Body three."
        }
    ]
}
""".data(using: .utf8)!
Now we don’t get any items. Instead, we get an error telling us that our third item is missing a value for “sender”.
We could go back to our model and make sender optional. In some cases, it might make sense, but what does it mean if a message has no sender? This data may be required by our UI or even for another API that the app is using. Besides, if we go make all the fields optional we might as well just have used the older JSONSerialization instead.
One option would be to use manually implement the initializer and skip over any bad items by decoding into a dummy object.
Custom Decodable
struct Dummy: Decodable { }

struct MessagePage: Decodable {
    let page: Int
    let limit: Int
    let items: [Message]

    enum CodingKeys: CodingKey {
        case page, limit, items
    }

    init(from decoder: Decoder) throws {
        let container = try decoder.container(keyedBy: CodingKeys.self)
        page = try container.decode(Int.self, forKey: .page)
        limit = try container.decode(Int.self, forKey: .limit)
        var items = [Message]()
        var itemsContainer = try container.nestedUnkeyedContainer(forKey: .items)
        while !itemsContainer.isAtEnd {
            do {
                let item = try itemsContainer.decode(Message.self)
                items.append(item)
            } catch {
                _ = try? itemsContainer.decode(Dummy.self)
            }
        }
        self.items = items
    }
}
Now we get the good items in the array and allow the bad items to drop off.
We need the dummy object because the index of the decoder doesn’t increment when a decode fails. We can abstract that away with a failable decodable object.
Failable Decodable
struct FailableDecodable<Element: Decodable>: Decodable {
    var element: Element?
    init(from decoder: Decoder) throws {
        let container = try decoder.singleValueContainer()
        element = try? container.decode(Element.self)
    }
}
This allows us to remove the Dummy object and rewrite the initializer as follows:
init(from decoder: Decoder) throws {
        let container = try decoder.container(keyedBy: CodingKeys.self)
        page = try container.decode(Int.self, forKey: .page)
        limit = try container.decode(Int.self, forKey: .limit)
        var items = [Message]()
        var itemsContainer = try container.nestedUnkeyedContainer(forKey: .items)
        while !itemsContainer.isAtEnd {
            if let item = try itemsContainer.decode(FailableDecodable<Message>.self).element {
                items.append(item)
            }
        }
        self.items = items
    }
This isn’t scalable yet, it’s a lot of boilerplate to write anytime you have an array that could fail. Let’s fix that.
Lossy Decodable Array
struct LossyDecodableArray<Element: Decodable>: Decodable {
    let elements: [Element]

    init(from decoder: Decoder) throws {
        var elements = [Element?]()
        var container = try decoder.unkeyedContainer()
        while !container.isAtEnd {
            let item = try container.decode(FailableDecodable<Element>.self).element
            elements.append(item)
        }
        self.elements = elements.compactMap { $0 }
    }
}
Now we can greatly simplify the MessagePage object.
struct MessagePage: Decodable {
    let page: Int
    let limit: Int
    let items: LossyDecodableArray<Message>
}
Looking pretty good. The thing I don’t like is that you have to access the messages using items.elements. So let’s fix it.
extension LossyDecodableArray: RandomAccessCollection {
    var startIndex: Int { return elements.startIndex }
    var endIndex: Int { return elements.endIndex }

    subscript(_ index: Int) -> Element {
        return elements[index]
    }
}
Now we can access the elements as we did originally and everything is working nicely.
Conclusion
I like using Decodable models to represent objects returned by backend APIs. Unfortunately, the data isn’t always perfect, and it can be challenging to find a clean solution using Decodable. However, with some persistence and the right abstractions, we can create scalable solutions. I really like how this case turned out, and I hope you do too.
I’d love to hear your feedback, questions or thoughts; find me on twitter @kenboreham
🔥 Thanks for reading! 👍
Best strategies for configuring multiple environments in Xcode projects

What things do you configure based on different environments? You might have views that are only for debugging, or you might want to turn off logging for release builds. You probably have multiple backend environments to configure like dev, QA, UAT, stage, prod, etc. Each of these requires different root URLs, API keys and app secrets. The app may also integrate with social media, crash reporting tool, or other analytics tools and we shouldn’t pollute this data with our testing efforts. We might also want to change the app icon and app name to make it visible which environment an installed app is running.
It’s easy enough to develop simple iOS apps and not worry too much about configurations. When you are just starting, it’s probably ok to do some setup with code, modifying the values as needed. You might even try commenting/uncommenting lines of code to switch between different configurations. Some people use #if DEBUG. Either of these will become problematic, quickly. It’s error-prone and time-consuming. So, what do we do?
Add some color to your tvOS buttons

The interface for UIKit is the same between iOS and tvOS, but the behavior is a little different. The interaction on tvOS is distinctly different than iOS because tvOS doesn’t offer direct interaction. Instead of tapping the screen you use a remote. This is an important point when deciding on how to customize interactive elements.
In this article, I’m going to discuss how you can add color to your buttons on tvOS. This is often required for consistency and branding purposes.
There are a couple of options depending on what your requirements are. The problem is that you might have to try a few approaches to get the desired look.
I will quickly go through what I’ve tried, what worked and what didn’t.
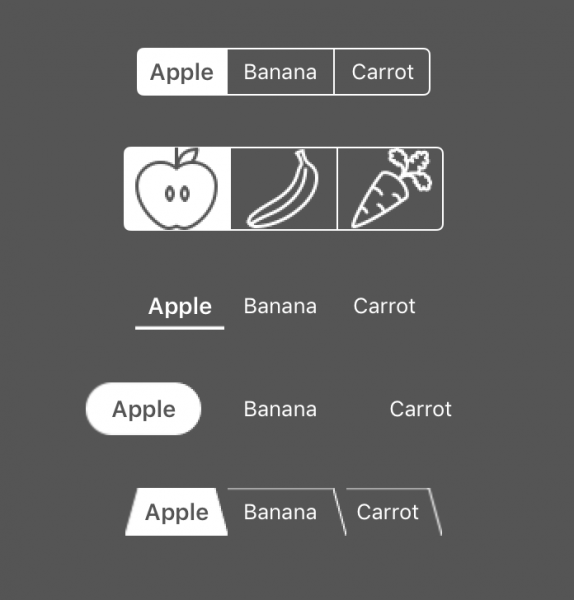
How to customize UISegmentedControl without losing your mind

The UISegmentedControl provided by UIKit is a ubiquitous control. However, when it comes to customizing this control, it can get pretty tricky. So I’m going to try to explain how this widget can be styled to better match your app by walking through a few different customizations.
The image below shows the different styles we will build.
Master map, compactMap, flatMap, reduce and filter by creating your own implementation

There are a few higher-order functions for collections that can be rather difficult to fully understand. While there are several good resources out there to learn the basics, it can still be confusing and seem a bit like magic. And when things seem like magic they tend to not get used effectively or maybe not at all.
In this post, I’m going to try explaining map, compactMap, flatMap, reduce and filter by walking through their inputs, outputs and deriving an implementation for each. For simplicity, we will focus on arrays but this can be expanded to most data structures. The goal is only learning the ideas, not to implement the best possible solution.Read More »
Beyond 128-bit integers

I just finished a post related to the top range of integer values that are supported by Swift.
The conclusion was that we can use the Decimal type to hold integer values with up to nearly 128 bits. That’s an impressively large number.
It’s hard to imagine a case where you would require both a larger number and precision at the least significant figures. However, it does make an interesting exercise so let’s give it a shot.
Unit testing: Stubs, Fakes, Mocks
June 24, 2024
Uncategorized
Comments Off on Unit testing: Stubs, Fakes, Mocks
Ken Boreham
Effective communication with your team is crucial. No matter what terms you use, agreeing on and adapting to the preferences of your team is the most important takeaway.
This is how I think of these terms and how they are used on my team.
Stubs
A stub is a minimal unimplemented module.
This is not specific to unit testing. When you begin working on a module, it will have some required interface to allow it to be coupled to the overall system. Generally, you would “stub out” some minimal code that will allow your system to compile. Once you have a stub, you can work on adding tests and filling in the functionality.
Creating a stub example:
This is just enough to make the project compile/run. The next thing you might do is have it actually return a User, but you don’t have any users so you need to create fake users.
Fakes
A fake is a data object with made-up data.
You could return hard-coded literals, but it’s often useful to have some variety. There are useful generators such as
fakerto help out.Creating a fake user example:
Great, but we don’t want to create fakes in the real implementation, so how can we use this in our test environment and inject it into the system?
Mocks
A mock is an implementation of a dependency that is injected in.
Mocks are used in unit testing to replace external dependencies. This allows for predictable/testable behavior. For example, mocking network requests allows you to test positive cases and fault cases without the unpredictable nature of actual network calls.
Mocks will often include some metadata so that you can “Spy” on them and understand how they are used after being injected.
In an integration test, the real implementation is used.
Creating a mock example:
That is how stubs, fakes, and mocks work together to build up tests and implementations.
Share this:
fakemockstubunit testing